Thursday, May 7, 2020

Review: OASE BioMaster 600

I have been using the OASE BioMaster 600 for almost a year. And guess what? I never needed to bring out the whole filter unit for cleaning or maintenance! Why? Let me jot down some reviews on this filter beast to share with you guys! 😊

My OASE BioMaster 600


First and foremost, the feature that I really love about my OASE BioMaster is the EasyClean pre-filter unit. I wish that canister filters would have this pre-filter function. Cleaning works to the filter is done within 5 minutes now with OASE Biomaster. You just need to turn the filter off, remove the pre-filter from its chamber, bring it to a sink and clean all pre-filter sponges and assemble it back to the filter. Voilà! It is extremely easy and convenient! You don’t even need to prime the filter again to let the filter run. For almost the whole year I only needed to clean that pre-filter without moving the whole filter out of the cabinet and it will go on. In my opinion, that feature alone is tempting enough to any aquarium owner. 😉

My favourite pre-filter part is that big blue "button"on the left. It also works as a prime button, super convenient. 

Another interesting feature about the filter’s design is its foolproof mechanism. It is so well designed and easy to operate that users can hardly assemble / disassemble it wrongly.

 Foolproof locking mechanism

The filter volume is large (i.e. 6.8L), even though its footprint is compact. Thanks to the narrow shape, it can fit in most cabinets nicely without taking up much space. The original media (i.e. plastic Hel-X) and lots of sponge filters that come with OASE BioMaster are however not so impressive to me. I replaced those with other more effective bio-media anyway. By doing so, I can make use of the large volume filter media more effeciently.

Small foot print, yet large in filter volume design.

Filter flowrate is quite decent at 1,250L/hr. However, due to the fine pre-filter sponge (i.e. 45ppi), flow is somehow reduced quicker if pre-filter is clogged. So whenever I see a sign of flow reduction, I know it is time to clean the pre-filter, then after the process everything is like new again. That point is certainly a “give-and-take” and I am willing to trade-off with the ease of maintenance. 

Last but not least, the filter is also very quiet while operating thanks to the rubber dampers at the bottom of filter. When my cabinet is closed, the filter is totally quiet. This characteristic is important to me since my planted tank is the center decoration piece in my living room. 😊

OASE BioMaster 600, one of my most favourite canister filters


Overall, I am very satisfied with OASE BioMaster 600 and this is one of the my favorite canister filters so far. For those who are always procrastinating in maintaining the filter (like me some times), you would love this masterpiece! 😊

Purchase Link of OASE BioMaster 600 on Amazon: https://amzn.to/2yFiilr 

Tuesday, November 19, 2019

"27L The Jungle Cube"- Contest Results

2019 has been a remarkable year for "The Jungle Cube" tank.

I have sent photos of this tank to 3 Aquascaping Contests this year. Personally, I like to send the tank to contests not for ranking competition as I know there are many aquariums out there which are way much more outshining, but just to put it as a milestone for the tank itself. Nevertheless, it has always been a feeling of excitement while waiting for the result though :). 

The first contest is the IIAC (ISTA International Aquascaping Contest) which is open for application from 1 Feb to 30 Jun yearly. "The Jungle Cube" was ranked 255 out of 535 participants. Very happy with the result. Yay!

IIAC 2019 Result

The second contest is AGA Aquascaping Contest 2019 (by Aquatic Gardeners Association). This contest only shows ranking for the Top 10 of each category and "The Jungle Cube" was not in the list. However, all of the participants's works are shown on the website. Here is the capture of "The Jungle Cube", details can be found at: https://showcase.aquatic-gardeners.org/2019/show182.html


AGA Aquascaping Contest 2019 result

The third contest is Brazilian Aquascaping Contest. The result has been out recently and this tank was ranked 24th for "The Best Foreign Aquarium 2019" category (https://www.cbap.com.br/en/inscricao/the-jungle-cube/). I am really happy with the result and especially because I received a positive comment from the famous Aquascaper Takayuki Fukada " This is a small tank but very well organized layout. It is great, but anyway, I want to see a bigger tank layout". Thank you, Takayuki Fukada, for your encouragement. 


And for now, here are the photos of the final shots of "The Jungle Cube". I hope you enjoy the journey of this cube tank as much as I do. 


Wednesday, July 3, 2019

"The Tiny Mighty Cave"- Dry Start Method (DSM)

Have you ever heard about DSM before? That is not "Dover Street Market" as what you can see from the first Google Search. If you search the keywords "DSM Aquarium", you will get the right result for "Dry Start Method" for planted tanks.

This method starts with the emersed growth of plants in a high humidity environment. Once the plant root systems are developed and plants are healthy, water can be introduced into the tank and the submersed form can be established. It is quite similar to the nature of the riverbank where water raises up and down and aquatic plants need to adapt to such environment. Emersed planting setup was mentioned in my other post on a small scale.


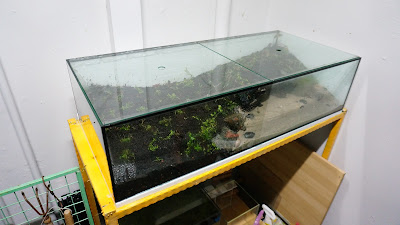
I finally decided to go for a super low-tech tank at my outdoor corridor using DSM. 

Since I already got a metal aquarium stand which is very sturdy, I just needed to hunt for the tank itself. It was no rushing at all. I normally enjoy the period of gathering the equipment one-by-one.  J Furthermore, I really enjoy the process of making something old/rusty/ antique into something more aesthetic. It is like bringing a brand-new life into it. 

And the chance came on Facebook Market. I found the aquarium size of 90cmLx40cmWx22cmH which was perfect for my plan. I want to have a low-tech tank which I can enjoy it as an aquarium as well as a pond. With this shallow tank, I can have a good view from the top and the fishes got benefits from the wide and long surface to wonder around. So, I quickly arranged with the seller to secure the deal which is inclusive of delivery fee with a very reasonable price.


I bought a white foam matt from an LFS in Serangoon North to insert as a cushion below the tank and, tada, everything was ready for setup.
Out-door low-tech tank

To create the "cave" for the fish family, a piece of driftwood which has an existing hole was used and laid horizontally on the bottom of the tank. Since I would like to create a bay of sand at the front of the tank, some granite rocks were used to create the barrier of soil and sand. Granite rocks do not have very outstanding characters as seiryu rocks/ elephant skin / manten stones...etc. but they work very well to separate planting area and sandy area in your aquascape. My plan is to cover those rocks with moss anyway, so the looks of the rocks was not so critical. :)

The bay was formed up with rocks and woods

Driftwood that creates the " mighty cave" :P

Cave by The Bay. Haha! :P
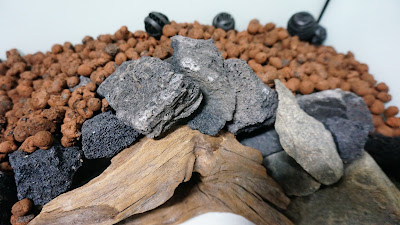
To form the captivity and cave's dome, lava rocks were arranged on top to create the cave structure. Lava rocks are normally light and very porous which can house more beneficial bacteria for planted tanks. Since this tank was going for very low-tech type, the more "in-house" bio media like those lava rocks we have in the tank, the better.

Forming cave dome by lava rocks
Next, some left over plastic bio-ball media was put in to fill the bottom layer of the tank.

Plastic bioballs were scattered at the bottom

Bioballs can be good for bacteria housing as well
 A bag of LECA balls was put at the tank bottom to house beneficial bacterias. This tank would be the very low-tech tank, running without filter, hence the more bio media placed in the tank, the better.
LECA balls were spread at the bottom of the tank.

LECA balls were also used to fill in the gaps between lavarocks to make the structure more solid


Garden soil was put on top of LECA balls layer to keep the balls down at the bottom and not floating up. Garden soil is very rich in nutrient and would be able to nurture the plants properly.


ADA Aquasoil was placed on top of garden soil to create a nice-looking surface and also to contain the mess of garden soil after water is introduced into the tank.

ADA Aquasoil was placed as a top layer soil

The top layer was adjusted according to the desired layout curve
Sand was introduced in the bay and the hardscape is completed. 

Sand was added in the bay :)

The cave now looks quite nice by the bay ya?

The Tiny Mighty Cave is here. :)

Overall hardscape view
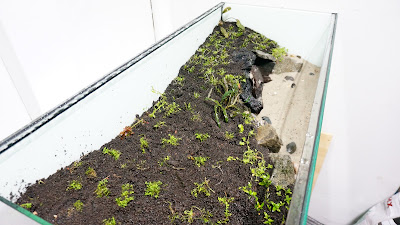
Planting would be the next step:


Lastly, the tank was covered with glassed to keep the humid environment for emersed growing. 


In order to keep the environment always humid, I spray water on the plants once to twice a day in the morning and/or evening. The plants were then always kept in the fresh condition.

Progress of DSM from Day 1 to Day 30 before it was being flooded. ^^


After a month of DSM, all the plants have grown very well in the humid environment. All of them were so lush and beautiful.


It's time to flood the tank! The plants roots have developed very well now! Hence, it would be ready for the submersed adventure! ^_^

Water was slowly added in the tank


A timelapsed video was recorded this big event after a long wait! Haha.


Tada! Flooding done!

All is well! :)

Plants look beautiful


I hope that you enjoy the journal as much as I do. And here you go, the "Tiny Mighty Cave":

"The Tiny Mighty Cave" ^_^